Wondering ohow to take good photos of bad weather while venturing outdoors in bad weather may not fill you with excitement, but if moody im...
Wondering ohow to take good photos of bad weather while venturing outdoors in bad weather may not fill you with excitement, but if moody images are your goal, nothing beats it.
As a child, the Norwegian explorer Aron used to sleep with his bedroom window open in an effort to acclimatise his body to the cold. Years later, he became the first man to reach the South Pole. OK, I’ll admit that Amundsen’s success was based on factors far more significant than shivering in his bed three decades earlier, but you have to admire the man’s commitment.
That same level of commitment is also required in landscape photography, especially at this time of year. With the long, hot days of summer now nothing but a fast-fading memory, the idea of trudging up a hill in the cold and wet is about as appealing as mumps when you could be slouched in front of the TV, feet on the dog, watching EastEnders. But it’s these very conditions that produce the most dramatic and memorable images, so if you take the easy option and turn into a couch potato whenever the sun goes in, you’ll be missing out on some of the best photo opportunities of your life. Fortunately, black & white photography is better suited to dodgy days than colour, so you’ve already got a head start. Here are my top 10 tips for making the most of bad weather.
Bad weather images don’t have to be dark, dramatic and full of detail minimalist compositions can work just as well. For this shot I used a long exposure to smooth out the water so the wooden pontoon and ladder stood out against it.
There’s nothing better than when the sun breaks through a stormy sky and illuminates the landscape below. It’s difficult to predict if, when and where this will happen, but that adds to the challenge and when it comes good, you can’t fail to produce epic images.
Stormy weather is hard to beat when it comes to creating dramatic black & white images. You might get a soaking if the heavens open, but the risk is well worth taking and you can always pack a brolly!
If the sun isn’t out and the landscape is lit by the sky you’ll definitely need a grad to ensure the sky doesn’t overexpose, or you can select and darken the sky during postproduction. I prefer to use a grad so my shots are finished in-camera I’d rather be out shooting than chained to a computer.
When faced with a stunning sky like this, how could you not make a feature of it? A red filter preset was used during conversion in Silver Efex Pro 2 to emphasise the beautiful broken clouds.
On beaches there are rocky outcrops, shallow pools, upturned boats, sand ripples, outflow streams, pieces of driftwood, battered groynes. If you are inland then use walls, paths, streams and boulders. To ensure you record the whole scene in sharp focus, employ hyperfocal focusing so you can maximise depth of field without stopping your lens to its minimum aperture with a wideangle lens you should rarely need to stop down beyond f/11 if you focus on the hyperfocal distance.
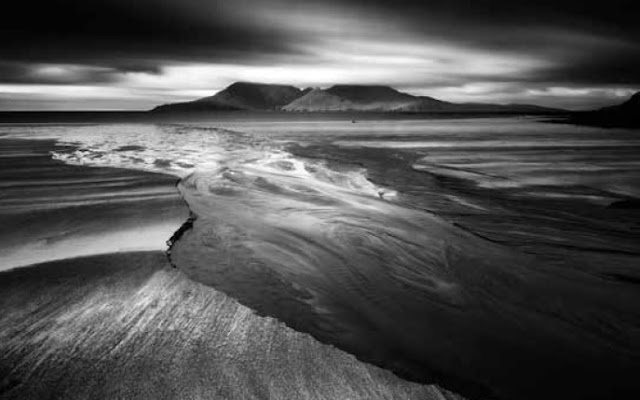
This tidal stream and sandy ledge at Laig Bay added foreground interest as well as leading the eye towards the island of Rum in the distance. The texture in the sand looks amazing in monochrome.
Fortunately, preparation is easier now than ever before thanks to the internet. You can check the weather forecast for tomorrow, the day after, next week. You can establish sunrise and sunset times for any day of the year. You can confirm tide times if you’re heading to the coast. The more information you can gather, the more likely you are to be in the right place at the right time to take advantage of fantastic light. And if things don’t go according to plan, well, you may end up taking photographs that are actually better than you’d hoped for, because unexpected changes in the weather often produce spectacular conditions that can’t be planned for, but by being on location you’ll be able to take advantage of them.
When you’re shooting on the coast, it’s important to know the tide times as well as the weather forecast. For this dawn shot I also recced the location the day before.
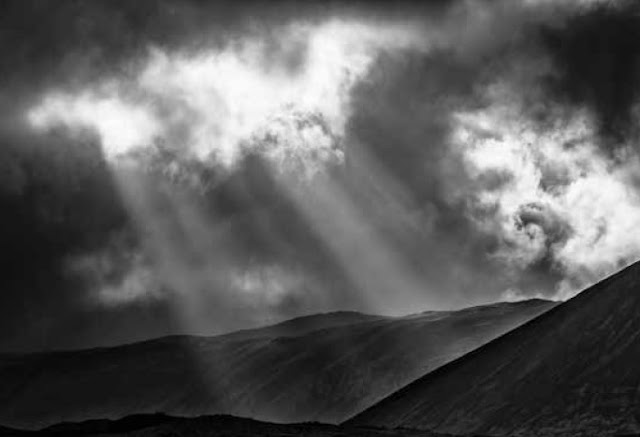
I took dozens of shots of this scene as clouds drifted across the sky and sunbeams danced on the mountains. Carefully editing in Photoshop and Silver Efex Pro 2 maximised the drama.
Although slow shutter speeds are normally used to photograph waterfalls, I bucked the trend for this shot as I wanted to capture texture in the water.
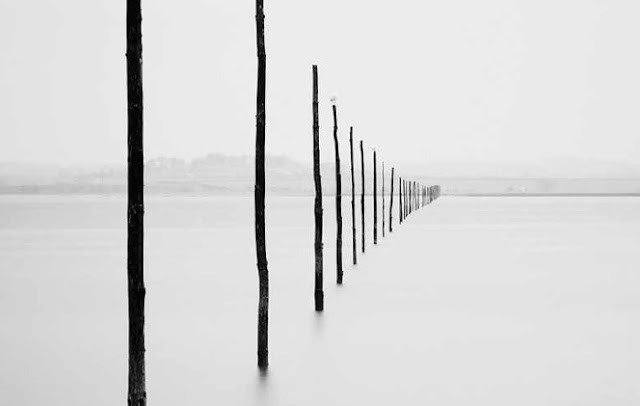
The soft light and muted tones of dull days provide ideal conditions for long exposure photography. This minimalist image was shot in persistent drizzle with photographer and camera sheltering under a large brolly.
The effects are amazing. Overcast weather suits the technique because contrast is low and the light nice and soft so you can create very simple, graphic images. Stormy days work well too as the sky records as layers of dark tone. The coastline is a perfect hunting ground for suitable subjects groynes, posts, jetties and boulders can be contrasted against the sea and sky to produce wonderful fine art images. In towns and cities, use a long exposure to blur the sky so it contrasts with the strong lines and bold angles of buildings juxtaposed against it.
As a child, the Norwegian explorer Aron used to sleep with his bedroom window open in an effort to acclimatise his body to the cold. Years later, he became the first man to reach the South Pole. OK, I’ll admit that Amundsen’s success was based on factors far more significant than shivering in his bed three decades earlier, but you have to admire the man’s commitment.
That same level of commitment is also required in landscape photography, especially at this time of year. With the long, hot days of summer now nothing but a fast-fading memory, the idea of trudging up a hill in the cold and wet is about as appealing as mumps when you could be slouched in front of the TV, feet on the dog, watching EastEnders. But it’s these very conditions that produce the most dramatic and memorable images, so if you take the easy option and turn into a couch potato whenever the sun goes in, you’ll be missing out on some of the best photo opportunities of your life. Fortunately, black & white photography is better suited to dodgy days than colour, so you’ve already got a head start. Here are my top 10 tips for making the most of bad weather.
KEEP IT SIMPLE
Bad weather tends to simplify the landscape, creating mysterious minimalist forms. Mist and fog are especially effective at this because they reduce visibility and hide fine detail, so only bold features stand out. Everyday elements such as lamp posts, trees and telegraph poles peering out of the gloom work well. Bridges, roads, paths and fence lines make good subjects too because as you look along them they slowly fade to nothing. Use a telephoto lens to isolate parts of the scene and emphasise the effects of mist and fog, or a wideangle so you can include foreground interest visibility is clear at close range but then reduces with distance.Bad weather images don’t have to be dark, dramatic and full of detail minimalist compositions can work just as well. For this shot I used a long exposure to smooth out the water so the wooden pontoon and ladder stood out against it.
STORM WARNING
The most dramatic landscape images tend to be created in bad weather simply because conditions are more extreme dark, stormy skies, high winds and changing light provide the perfect ingredients for success. Of course, in order to take advantage of those conditions you must brave the elements which means you could get soaked when the heavens open and return home empty-handed, but then equally you could take the best images of your life. It’s a risk worth taking!There’s nothing better than when the sun breaks through a stormy sky and illuminates the landscape below. It’s difficult to predict if, when and where this will happen, but that adds to the challenge and when it comes good, you can’t fail to produce epic images.
Stormy weather is hard to beat when it comes to creating dramatic black & white images. You might get a soaking if the heavens open, but the risk is well worth taking and you can always pack a brolly!
THE SKY’S THE LIMIT
Bad weather photography is all about the sky the more dramatic the better. On stormy days when the sky is dark and threatening and the sun bursts through to illuminate the landscape below, you can’t fail to take great shots mother nature has done all the hard work for you. In such conditions you can usually get away without using an ND grad to tone down the sky because it will be darker than the landscape for a change. That’s not to stop you using a grad to make it even darker and more dramatic than it was in reality though a 0.6 grad will do the trick.If the sun isn’t out and the landscape is lit by the sky you’ll definitely need a grad to ensure the sky doesn’t overexpose, or you can select and darken the sky during postproduction. I prefer to use a grad so my shots are finished in-camera I’d rather be out shooting than chained to a computer.
When faced with a stunning sky like this, how could you not make a feature of it? A red filter preset was used during conversion in Silver Efex Pro 2 to emphasise the beautiful broken clouds.
FILL THE FOREGROUND
I like a good foreground, something to lead the viewer’s eye into the scene and add a sense of depth and scale. Use a wideangle lens or zoom (I favour my 16-35mm), get down low and move in close to make the most of foreground interest. For maximum effect, shoot in portrait format. All kinds of features can be used as foreground interest.On beaches there are rocky outcrops, shallow pools, upturned boats, sand ripples, outflow streams, pieces of driftwood, battered groynes. If you are inland then use walls, paths, streams and boulders. To ensure you record the whole scene in sharp focus, employ hyperfocal focusing so you can maximise depth of field without stopping your lens to its minimum aperture with a wideangle lens you should rarely need to stop down beyond f/11 if you focus on the hyperfocal distance.
This tidal stream and sandy ledge at Laig Bay added foreground interest as well as leading the eye towards the island of Rum in the distance. The texture in the sand looks amazing in monochrome.
GET CLOSER
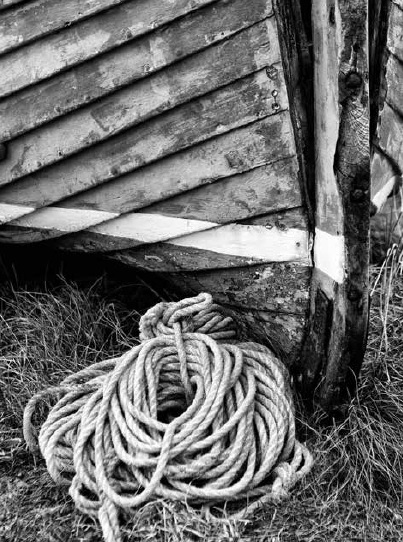
Part of the problem with flat, dull weather is that the sky’s usually washed out and featureless just an endless blanket of grey. But if you exclude the sky from the shots altogether it can’t upset you, can it? In fact, while you’re at it, instead of just getting rid of the sky, why not ignore wider views altogether and concentrate on details? Lichens on rocks, tree bark, patterns in sand, peeling paint, rusting metal, water droplets on car bodywork. The soft light you get on dull days is perfect for shooting details because contrast is low so you don’t have to deal with harsh shadows or brilliant highlights. On dull, overcast days it’s worth heading to a location where you know you’ll find interesting details to shoot. I could easily spend a whole day on Holy Island.BE PREPARED
Louis Pasteur’s saying ‘Chance favours the prepared mind’ certainly applies to landscape photography. Obviously, luck plays a part too you can grab a camera, head outdoors and bag amazing images without any forethought but planning definitely puts the odds of success in your favour.Fortunately, preparation is easier now than ever before thanks to the internet. You can check the weather forecast for tomorrow, the day after, next week. You can establish sunrise and sunset times for any day of the year. You can confirm tide times if you’re heading to the coast. The more information you can gather, the more likely you are to be in the right place at the right time to take advantage of fantastic light. And if things don’t go according to plan, well, you may end up taking photographs that are actually better than you’d hoped for, because unexpected changes in the weather often produce spectacular conditions that can’t be planned for, but by being on location you’ll be able to take advantage of them.
When you’re shooting on the coast, it’s important to know the tide times as well as the weather forecast. For this dawn shot I also recced the location the day before.
SHOOT SUNBEAMS
Also known as crepuscular rays, sunbeams are created when the sun shines through small gaps in an otherwise cloudy sky. Sometimes there’s just one or two beams, but on occasions you’ll see a whole band of them streaking down to the horizon. A telezoom lens will allow you to home in and make a feature of sunbeams. During post-production you can also darken the images and increase contrast so the beams stand out boldly.I took dozens of shots of this scene as clouds drifted across the sky and sunbeams danced on the mountains. Carefully editing in Photoshop and Silver Efex Pro 2 maximised the drama.
ADD WATER
Waterfalls make perfect dull day subjects. The light is nice and soft and contrast low so, as with woodland, you don’t have to worry about high contrast causing problems. Use an exposure of ¼ to 4 seconds to blur the water the slower you go and the faster the water’s flowing, the more blurry the effect. On gentle waterfalls you may need to expose for several seconds to get the desired effect, but for big falls after heavy rain, ¼ to ½sec should be slow enough. Use an ND filter or a polariser to extend the exposure if necessary. A polariser serves a dual purpose as it will also remove glare and boost colours in the scene.Although slow shutter speeds are normally used to photograph waterfalls, I bucked the trend for this shot as I wanted to capture texture in the water.
CONVERT TO B&W
The very act of removing colour from an image is a great way to make the most of dreary weather. It takes that image one step away from reality and gives you more room for creative interpretation you can boost contrast, darken the sky, add drama; basically do whatever you like to put your own stamp on it. I favour Silver Efex Pro 2 (see niksoftware.com) for black & white conversion and find the High Structure preset to be very effective on bad weather shots.The soft light and muted tones of dull days provide ideal conditions for long exposure photography. This minimalist image was shot in persistent drizzle with photographer and camera sheltering under a large brolly.
SLOW IT DOWN
Extreme ND filters like the Lee Filters Big Stopper or Hitech Pro Stop 10 are ideal in bad weather because you can slow the exposure down to several minutes in broad daylight and record the passing of time instead of freezing it. Clouds record as delicate streaks of tone, water turns to milk, people and traffic disappear altogether.The effects are amazing. Overcast weather suits the technique because contrast is low and the light nice and soft so you can create very simple, graphic images. Stormy days work well too as the sky records as layers of dark tone. The coastline is a perfect hunting ground for suitable subjects groynes, posts, jetties and boulders can be contrasted against the sea and sky to produce wonderful fine art images. In towns and cities, use a long exposure to blur the sky so it contrasts with the strong lines and bold angles of buildings juxtaposed against it.


COMMENTS